YouTube Shop Student

 Captured Nut Puzzle
... a YouTube Shop Student Project
This project was developed to help a beginning machinist or hobbyist develop machining skills using the metal lathe. Please keep in mind that I am a beginner myself and not all procedures in this document may be correct, but I have done all that I can to minimize error. Also keep in mind that like skinning cats, there are other ways this project can be completed. Meaning the steps that I outline here are not set in stone. You can download the complete project by clicking the PDF icon in the upper right of the screen.
Why a captured nut puzzle?
While the end result is only a toy of little practical use, I think the operation involved in making it are a great benefit to the beginner machinist. Operations that need to be performed to complete the project include facing, center drilling, drilling, turning to diameter, grooving, chamfering and single point threading. These operations must be mastered along with others while learning to use a metal lathe. And that, my friend, is why I decided on this project.
A note about accuracy
When making the puzzle, it is important that we work as accurately as we can. Not because the puzzle requires it, but rather because we need to hone our budding skills. If you mess up a little trying to get to a certain dimension, don’t sweat it too much, the puzzle will turn out just fine. However, do try your best to machine your parts as accurately as you can.
A note on safety
Revolving machinery can be deadly if steps to work safely are not observed. I assume that you know things like wearing safety glasses, no long sleeve shirts, no neck ties or jewelry, etc, etc. Safety when operating you lathe is YOUR responsibility, not mine or anyone else's. Please observe all safety practices while using the metal lathe.
What is included?
I have included a drawing and assembly diagram for the puzzle. In addition I have listed out the sequence of operations that I have taken to complete the project. Keep in mind as I repeat from above, there are probably as many ways to do this project as there are machinists. If you have a better way of doing it, then please feel free to change things up.
An invitation to watch
I have completed a series of videos on my YouTube channel demonstrating how to make this puzzle. I invite you to watch them and if you are very new to machining, I encourage you to do so. I have inserted the videos below if you care to watch them. They are also on the YouTube Shop Student Page.
(VIDEOS INSERTED HERE ... Coming Soon)
Questions and Comments
Any questions and comments are welcome, or if you would like to send me a picture of your finished puzzle. You can email me at xavier at gtec dot com or through the contact menu link above. I will do my best to answer questions that you may have. Additionally, constructive criticism is welcome. Anything that you may add to make this a better project is welcome.
De intentione cordis gratias ago
I would be remiss if I didn’t thank the following people for the friendship, help and technical guidance.
Art Eckstein
Richard (MSFN) - https://www.youtube.com/c/MakinSumthinFromNuthin
… Thank you gentlemen!
The Drawing
The drawing below shows the project to be made. You can download the complete project with a much larger drawing by clicking the PDF icon at the top of the page. Alternatively, you can click the image of the drawing below to download just the drawing in PDF format.

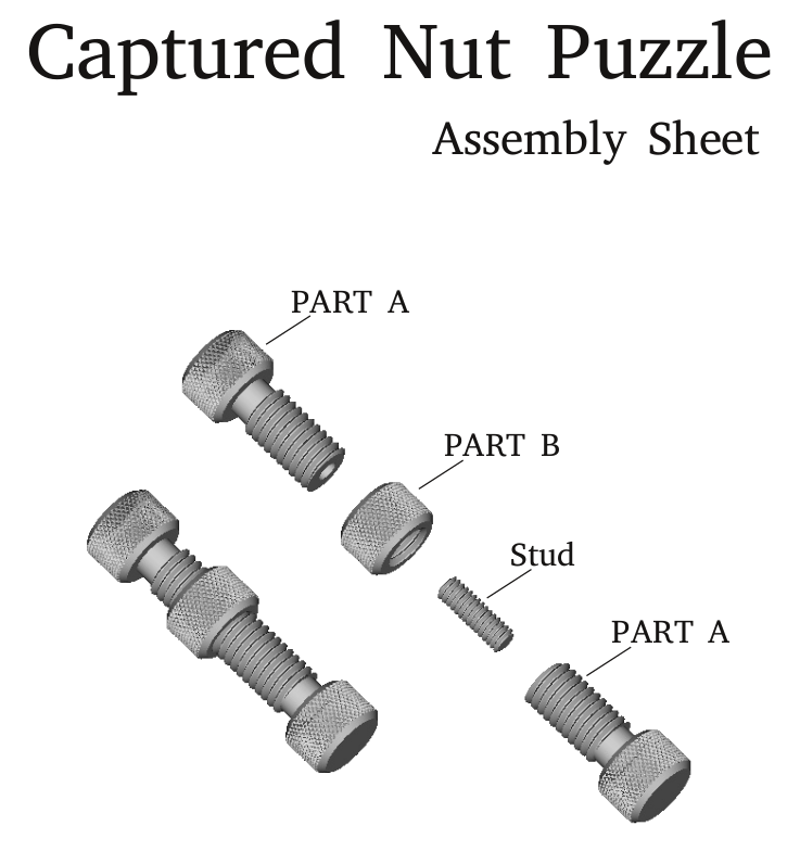
Assembly Diagram
I have also provided a 3D rendering of the assembly diagram. Again, you can download the complete project from the PDF icon at the top of the page, or click on the image below to download the PDF of the assembly drawing.
Sequence of Operations
Again let me reiterate that there are many ways that this project can be completed. The following sequence of operations are those that I took to complete it. Feel free to change them up any way you see fit. Additionally, the images I have included here are quite small. To see a larger version of the image simply click on it and it will open in a modal window.
The material I used to make this was a length of 3/4" 12L14 material purchased from Hobby Metal Kits.
 (1) Extend stock 1-3/4” from chuck Jaws
 (2) Face end of bar square
 (3) Center drill with #3
 (4) Cut off to a length of 1-9/16” (1.563”)
 (5) Reverse part in chuck, (6) Face to length of 1.500"

 (7) Center drill, then drill to depth of 1/2” with #7 drill. [Tap drill for ¼-20 UNC]
 (8) Tap hole ¼-20, follow with bottom tap
 (9) Lightly chamfer opening of thread to remove raised burr from the tapping operation and remove part.
 (10) Extend stock from chuck about 1” (11) Face end of bar square

 (12) Center drill and then drill to depth of 1/2” with #7 drill.
 (13) Tap hole ¼-20, follow with bottom tap, gently chamfer thread to remove burr from tapping.

 (14) Assemble first part [step 8] to this using ¼-20 stud and extend enough from chuck to allow the first 4” to be knurled. Support the end of the work with a center.
 (15) Knurl for a length of 4”
 (16) Very gently face end of bar to remove the burr the knurling tool pushed over. The material is hanging out quite a distance so only take a very light cut.
 (17) Cut thread grooves 0.188” wide to a diameter of 0.392” Note that the puzzle is in its assembled state and the width of the heads are 0.500” and the length of thread including the thread relief groove is 2.000”
 (18) Turn thread Major Diameter to 0.493”
 (19) Single point thread, ½-13 UNC 2A
 (20) Verify threads by measuring with thread wires.
 (21) Chamfer exposed edges of puzzle ends 0.063”
 (22) Part off to a length of 3-1/16” [This is the main puzzle]
 (23) Face off remaining stock in chuck until just cleaned up
 (24) Part off 5/8” of the knurled section remaining on stock
 (25) Mount main puzzle body in chuck using some soft packing to prevent damage to knurl. Face puzzle end to length, (26) Center drill end with #3 center drilling, (27) Chamfer end 0.063. Removed finished puzzle body
 (28) Using soft packing, clamp nut in chuck leaving at least 3/16” exposed.
 (29) Face nut just enough to clean up
 (30) Chamfer 0.063
 (31) Turn nut in chuck and face to length


 (32) Center drill #3. Pilot drill ¼” through and finally drill through with 27/64” drill [tap drill for ½-13 UNC]
 (33) Tap through ½-13 UNC
 (34) Chamfer 0.063”
 (35) Chamfer ½-13 threads on both sides of nut

 (36) Assemble puzzle proper and amaze your friends.
END OF PROJECT (last update 2018 MAY 25)
Welcome to the Projects Page
As I learn to use the equipment I have at my disposal, I will be coming up with projects to make along the way. I thought I would add them here along with any relevant drawings or information in the event someone else would like to do the same or similar project. I hope over time the list of projects will grow.
Project 1: The Captive Nut Puzzle
 The captive nut puzzle was a suggestion by one of my YouTube subscribers by the name of Jeremy Gagnon. When I thought about it a little I realized that there were a lot of operations that are done that would be great practice for a newbie like myself, including facing, turning to diameter, grooving, single point threading and more. So I designed my version of this puzzle, complete with drawings, 3D assembly and a sequence of operations. To check out this project, click the icon to the left or select it from the project menu on the right of your screen, or select this link to go directly to the Captive Nut Puzzle page.
The YouTube Shop Student
I have a desire to learn to use metal working machinery such as Lathes, Mills, Grinders, Shapers and any other related activity that belongs to the Metal Shop environment. I discovered that YouTube is an excellent resource to learn these things and there are a GREAT number of content creators out there that are willing to provide video instruction. Armed with videos from People Like, Lyle Peterson, Keith Fenner, That Lazy Machinist, MakinSumthinFromNuthin, and many, many more people and help from my own subscribers I am actually learning to use this sort of equipment. To my surprise, metal work is relaxing, fun and rewarding.
The YouTube Shop Student series is about my adventures in learning to do metal shop oriented things. It is targeted at other beginners and I hope some find it useful.
As I release a new episode, I will add the title and information about it below. If there are related files to go along with the episode you will be able to download them by clicking the icon next to the description. Additionally, if you have questions you may ask them here by clicking the contact menu item above and emailing me, or alternatively you may wish to post in the video feed on my YouTube Channel. Thank you for your support and patience with me. As always, constructive criticism is always welcome.
Episode 1: Introductions and some books.
This video introduces the YouTube Shop Student series and I discuss some of the books that I have bought over the years dealing with various aspects of shop work. This series is dedicated to all those folks out there that have taken the time to video the talents and skills. Thank you all for sharing.
Episode 2: Aligning Lathe Centers
In this video i demonstrate the skills I learned from Halligan142 on aligning the Lathe Centers. Rough centering with a box cutter blade, creating a test bar and measuring with the indicator
Episode 3: Aligning Lathe Centers ... Lessons Learned
In this episode I discuss some of the problems I encountered while doing the lathe centering and cover some possible reasons I had issues. I also discuss topics like vibration, rigidity and other related topics.
Episode 4: Machining the 4 Jaw Backplate
In this episode I machine the backplate to my 4 Jaw chuck. Special thanks goes to Mr Pete and other YouTube creators for demonstrating this process.
Episode 5: Machining a Spacer for the Chuck Backplate
In preparation of turning the backplate for a 3 jaw chuck, I need a spacer to allow me to turn the back of the chuck plate down in order to reduce the amount of counter bore on the plate. Join me as I make this part.
Episode 6: More Backplate Antics
I carry on cutting down the back hub of the backplate for the 3 Jaw chuck. I also cover some lessons learned from the last episode and discuss a couple tips I received from my subscribers. Thanks Folks!
Episode 7: Finishing the 3 Jaw Backplate ... Finally
In this episode of the YouTube Shop Student I finish machining the boss on the backplate for the 3 Jaw Chuck and fit the chuck to the plate. In addition I take some run out measurements of the finished chuck body and of some drill rod. Finally I make an unexpected discovery and injure myself to boot.